Pocketful of Paint

Get crafty with your bad self

looking for something?

  • Home
  • About
    • Hey There!
    • Joining My Email List
    • Contact Me
    • Linky Party List
  • Projects
    • Tutorials
    • DIY
    • Room Makeovers
    • Furniture
    • Kid Crafts
    • Wood Crafting
    • Home Decor
  • Recipes
    • Dinner
    • Desserts
  • Holiday
    • Christmas
    • Halloween
    • Easter
    • Father’s Day
    • New Year’s Eve
    • Thanksgiving
    • Valentines Day
    • St Patrick’s Day
  • Mom Thoughts
    • Family Fun
  • Freebies
  • Guest Posts
    • Linky Parties
  • Shop

Fabric Pumpkins

September 20, 2014 By Lynn 3 Comments

One afternoon I was watching good ol’ Martha Stewart on TV and she made some cute little pin cushion tomatoes.  A light clicked on in my brain- and I thought “those would be great pumpkins!” So here is my spin on Martha’s tomatoes.

You will need:

Fabric, matching or different colors

scissors

needle and thread

sewing machine

poly fill

thick quilters thread with a long needle

sticks

ribbon

hot glue gun

Fabric Pumpkin Tutorial

Start by cutting your fabric.  You will want to cut three rectangels.  5 x 10, 6 x 12, and 6.5 x 14

Put right sides of your fabric together and sew a straight line along the ends.

Fabric Pumpkin Tutorial

Keep inside out.  Thread your needle with a knot at the end and do a running stitch around bottom edge.

Fabric Pumpkin Tutorial Fabric Pumpkin Tutorial

Fabric Pumpkin Tutorial Fabric Pumpkin Tutorial

Pull tight the thread tight and knot.

You can know flip it right side out.

Fabric Pumpkin Tutorial

Stuff the inside very full with your poly-fill.

Fabric Pumpkin Tutorial

Then do another running stitch along the top edge to seal it up.  Pull tight and knot.

Fabric Pumpkin Tutorial

Fabric Pumpkin Tutorial

Now you will use your thick thread to create the sections of the pumpkin. Tie a knot at the end of the thread and poke the needle up through the center of the pumpkin.  This picture is the bottom of the pumpkin.

Fabric Pumpkin Tutorial   Fabric Pumpkin Tutorial

Pull the needle through the center top, let the thread go around the outside of the pumpkin.  Then turn the upside down pumpkin poke the needle in again going from the bottom, up through to the top and repeat till you have 4 or 6 sections.

Fabric Pumpkin Tutorial

Fabric Pumpkin Tutorial Fabric Pumpkin Tutorial

After you have gone around the number of times you like- poke the needle through the center top and straight back down to the bottom.  Not going around the outside of the pumpkin this time.  Pull tight and knot once or twice.  You want it tight, so the sections stick out.

Fabric Pumpkin Tutorial

Now hot glue a one inch stick to the top.  Tie a ribbon around the stick and WAA-LAA – you’re done!

Fabric Pumpkin Tutorial

Fabric Pumpkin Tutorial

Comments

  1. 1

    Lindsay says

    September 22, 2014 at 10:03 am

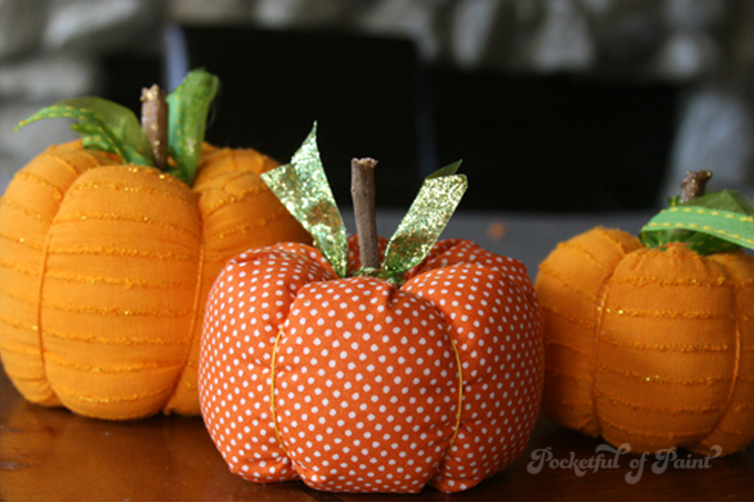
    These are so cute!!! Thanks for posting this. I’m excited to add them to my fall decor~

    Reply
  2. 2

    CheRI says

    October 6, 2014 at 7:34 pm

    I’m totally making some of these, thanks!!!

    Reply
  3. 3

    Allison says

    November 2, 2014 at 7:01 am

    I love this and I love that you share how to make. Very cool. Thank you so much! They are adorable.

    Reply

Leave a Reply to Lindsay Cancel reply

Your email address will not be published. Required fields are marked *

Hi, I’m Lynn!

I'm so glad you stopped by! Welcome to my Pocketful of Paint Blog! Let's get crafty!

Read More…

  • 
  • 
  • 
  • 

Featured Post

Hallway Bookrack – Small Space Solutions

When were moved into our home the basement was not finished, but it was partially framed. One of those framed walls was a little funky. It did not line up with the other “walls” it would meet up with. I wasn’t sure how to make it work with the room behind it. At the same […]

My Instagram

Load More...
Follow on Instagram

archives

Graphic Solutions by

DesignWright

Copyright © 2025 · Pocketful of Paint · Log in